So Black Widow's uniform has gone through many forms over the years, and her belt is no exception. For this outing, I decided to go with the gold belt so it really stood out in the darkness of the midnight show.
I started with wax paper to cover my work space, AMACO red terracotta clay (from Michael's), fishing line and a small screw:
Terracotta clay is pretty stiff and a pain in the butt to pull pieces off of, so I used the fishing line to "cut" slices of clay off the brick that it comes in.
I started out using a circle on my wax paper as a template for each medallion:
but that quickly deteriorated as the wax paper broke down and ripped, so I made a circle of cardboard and used that as a template from then on.
I made sure that one side of each medallion was flat and the other was rounded and used water to smooth the surfaces. Once each was done, I peeled it off the cardboard and poked a hole in either side with the small screw, making sure not to rip the piece and molding it back together with water if I did.
At that point, they just needed to sit and dry overnight and they came out beautifully:
I painted all but 2 (for safety) with about 3 layers of FolkArt #660 "Metallic Pure Gold" from Michael's.
The last 2 I painted with 3 layers of Craft Smart "Holiday Red" also from Michael's, drew the outline of the Black Widow symbol just outside of the size I wanted it (LIGHTLY in pencil) and traced it with the FolkArt gold, then painted the outside of the shape with 2-3 layers of gold:
When all the pieces were painted and dry, I sprayed them all down with a few layers of gloss spray (sprayed intensely close to make them extra shiny) and let them dry outside for a bit.
Once that was all done, I connected all the pieces with small gold jewelry rings (found in the Michael's jewelry section) with the logo piece in the middle and a small gold clasp in the back:
 |
| this is the only photo I have of the belt before what happened next... |
Isn't it beautiful? I tried it on when I finished and walked around a bit to make sure it was sturdy enough to withstand a bit of pressure and was pleasantly surprised.
The following is a dramatic retelling of what happened the night of the premiere:
 |
| only slightly exaggerated |
Yup. It shattered. Fell right off my hips as I took the first step downstairs and crashed to the ground.
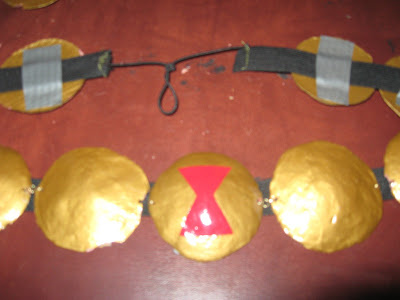
And so, with moments to go before we were technically late leaving, I super glued the pieces that weren't too shattered to a piece of elastic that didn't quite fit around my waist, duct taped the medallions to the elastic to ensure their security and sewed a strip of thinner elastic to the ends of the wide elastic so the piece would fit and cried my way out the door.
It doesn't look quite so terrible as I think it does with the whole get-up and the guys tell me you can't tell. But I know... I know...
BUT I did learn my lesson and next time I will be crafting the belt around an elastic base rather than relying on it holding up of it's own accord, or building stronger, thicker pieces that won't crumble at the first sign of real stress.
Hopefully my suffering will lead to smart decisions on your parts...
CosPlay with me
-Angi


No comments:
Post a Comment