Feel free to ask me anything. I'm here for you just as much as I'm here for me :)
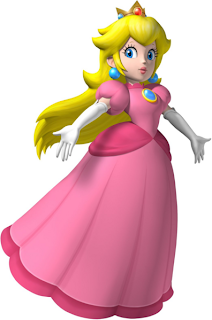
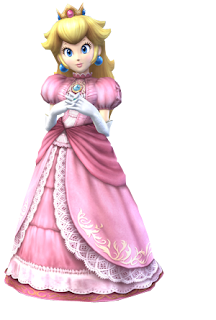
First and foremost, I did a lot of research on variations of Peach's dress before I got started. I wanted something a little more interesting in real life than the traditional dress:
But the guys wanted something that stayed closer to her traditional look than her Brawl dress:
And so, we landed on this:
Now, alas, in my endless searching, I still do not for the life of me know the source game of this image. But regardless, we loved this one and so off I went on my merry way...
You'll notice between the source image and my photos that they are missing the gold detailing along the skirt border and around the chest gem. I unfortunately ran out of time, so they are missing, though if I could, I would go back and put them in (you know, if the dress hadn't been destroyed in the process of shooting ><)
I started with 2 patterns for the dress, which I combined. The top (chest and neck) are Butterick B4929:
And the rest (skirt, sleeves and mid) is Simplicity 2813:
I sewed the pieces from B4929 so that the closure was in the back instead of the front and attached Wrights piping in Berry Sorbet along the center front seam. For the collar, I cut the same collar as the pattern and trimmed it so the edge that would be outside had curves. I sewed the same piping along that edge, turned it inside out and proceeded with the instructions.
For the sleeves, I used the pattern from 2813 and simply attached them to the top from B4929. I elongated the middle of 2813 and attached it below the bust of the top. I cut 2 pieces of the skirt, one in the light pink fabric, the other in the dark orange/pink. In retrospect, I wish I had kept the 2 layers, thus making what I did next more sturdy, but you have to make mistakes to learn from them.
I laid the 2 skirts so the orange was underneath and trimmed the pink so I had an arch going up in the front to about my knees and down in the back with about 6 inches to spare. I then pinned 1/4" Wrights Double Fold Bias Tape in Berry along the edge I just cut, layering the lace I had selected and orange fabric underneath the line, respectively. I sewed the Bias Tape on as usual, making sure it went through every layer (pink fabric, lace and orange fabric), attached the skirt, added a zipper and closed the seams.
(I did not have time or funds for lining, unfortunately, so the dress is pretty see-through, but it served it's purpose.)
That was actually the easy part.
Next I had to figure out how to make the crown:
And the chest gem:
The crown turned out to be pretty easy. I had a small sailor hat from this costume I bought myself after Halloween:
So I took the hat, folded it, traced the shape on the fold of my gold fabric, added spikes for the crown shape and a 1/2" leniency for seam and cut! 2 pieces (for lining). I sewed together the spikey end and traced out stiff, hatting interfacing. I placed the interfacing inside and ironed it to the inside of the hat. I slipstitched by hand the closure that would go on my head and attached (by hand) 2 small strips of scrap fabric that I curled into a loop on either side of the crown. These were used to push hairpins through and keep the crown from falling off my head while dancing around set. The red jewels are Jewelry Essentials Jewels from Michael's that I Super Glued in place.
I did a LOT of troubleshooting for the chest gem. What I finally wound up with that looked super awesome was, I cut a medium sized styrofoam egg in half, taking the smoothest side I could manage. I then CAREFULLY covered it with clay. All I had was that airy, never dries out stuff. For the future, I would probably use air-dry clay because you CANNOT put the styrofoam in the oven or it will shrivel up and ruin everything. I dried the clay as best I could with a hairdryer and when it felt decently dry/baked, I painted with thickly with FolkArt #656 Metallic Blue Sapphire paint. I did probably about 3 or 4 coats of this. I wanted it to be super shiny and really rich-looking.
Unfortunately, since the clay couldn't fully dry, the paint didn't either. This turned into a blessing in disguise. The way I saved it was to take a piece of plastic wrap (like you use in the kitchen to cover leftovers) and I wrapped it tightly around the "gem", pushing gently to even out as many wrinkles as possible and then glued it in place on the back.
To attach the gem to the dress, I cut a piece of scrap linen the size of the gem and sewed it to the inside of the dress where I wanted the gem to be placed. This gave me an extra layer of protection from the glue bleeding onto my dress form or scratching me up while acting. I placed a line of Super Glue around the gem and lined it up with the linen. I put drops of glue in any spots that were sticking out to make sure the gem lined up well with the dress and stepped back.
The gloves I had from my Anastasia cosplay a few years back. The ring and earrings where round jewelry bases with teal gems secured on (all found at Michael's). The wig was purchased an eternity ago for a Sara Mudo (Angel Sanctuary) cosplay I made for I-CON back on Long Island off of eBay. And I used a petticoat from the Halloween store to poof the skirt out (next time I'll make a petticoat that goes all the way down and fits ><).
In the end, the final product came out better than I'd expected:
HOORAY!
O.o
CosPlay with me
-Angi


No comments:
Post a Comment